Working with custom preprocessing methods
In this notebook, we will see an example showing how we can define and use our own custom preprocessing methods in PySS3 and also how we can tell the Live Test Tool to use them as well.
Let’s begin by importing the needed modules:
%matplotlib inline
import re

from pyss3 import SS3
from pyss3.util import Dataset, Evaluation, span
from pyss3.server import Live_Test

from sklearn.metrics import accuracy_score
from nltk.stem import SnowballStemmer
To keep things simple, the preprocessing process will consists of
applying just a simple stemming on the documents using the Snowball
Stemmer. So, we will define a simple function, called
my_preprocessing, to carry out that task for us.
stemmer = SnowballStemmer('english')

def stem(match):
    return stemmer.stem(match.group(0))

def my_preprocessing(text):
    # replace each word (\w+) with its stemmed version
    return re.sub(r"\w+", stem, text)
We will use the dataset we used for Sentiment Analysis on Movie Reviews tutorial. Let’s load the training and test sets.
x_train, y_train = Dataset.load_from_files("datasets/movie_review/train")
x_test, y_test = Dataset.load_from_files("datasets/movie_review/test")
[2/2] Loading 'pos' documents: 100%|██████████| 5000/5000 [00:47<00:00, 105.00it/s]
[2/2] Loading 'pos' documents: 100%|██████████| 500/500 [00:03<00:00, 126.37it/s]
Now that the dataset has been loaded, we will use our
my_preprocessing function to preprocess all the training and test
documents like so.
# Note: A better option would be to preprocess all the documents
# only once and then stored them to disk. Then, later we could
# load our new preprocessed version of the dataset. But we're keeping
# things simple :)
x_train_prep = [my_preprocessing(doc) for doc in x_train]
x_test_prep = [my_preprocessing(doc) for doc in x_test]
Let’s train our model using the preprocessed training documents we have
stored in x_train_prep. In addition, we need to use the
prepargument to tell our classifier to disable the default
preprocessing process (prep=False).
# In the "Hyperparameter Optimization" section at the bottom,
# it is shown how we obtained these hyperparemter values: s=.44, l=.48, p=.5
clf = SS3(s=.44, l=.48, p=.5)

# Let the training begin!
clf.train(x_train_prep, y_train, n_grams=3, prep=False)
Training on 'pos': 100%|██████████| 2/2 [00:13<00:00, 6.62s/it]
Let’s check if our classifier performs well at classifying the test documents.
# Here we're also disabling default preprocessing
# since ``x_test_prep`` is already preprocessed
# by our custom function
y_pred = clf.predict(x_test_prep, prep=False)

accuracy = accuracy_score(y_pred, y_test)

print("Accuracy was:", accuracy)
Classification: 100%|██████████| 1000/1000 [00:04<00:00, 205.17it/s]
Accuracy was: 0.853
Not bad. Note: better performance perhaps could be obtained by
performing hyperparameter optimization with our new preprocessed
dataset, since the hyperparameter values we’ve used (s=0.44, l=0.48,
p=0.5) were selected using the default preprocessing (but we’re keeping
this notebook as simple as possible).
OK, suppose we now want to visualize what our classifier is learning and
how he’s carrying out the classification process, we could just use the
live test as usual but this time using our preprocessed test documents
(x_test_prep) and again disabling the default preprocessing process
(prep=False), as follows:
# note we are using the preprocessed documents here (`x_test_prep`)
Live_Test.run(clf, x_test_prep, y_test, prep=False)

# Press Esc. + the I key twice to stop it
# * Remember that the Live Test will only work if you're running
#   this notebook, locally, on your computer :(
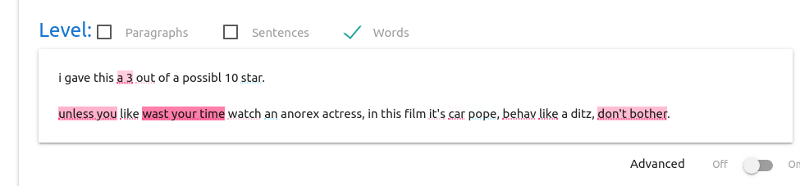
The visualization isn’t bad, however, documents are displayed as they
are in x_test_prep, that is, they are displayed preprocessed
(stemmed), as shown below:
It would be very nice to have the Live Test to display the documents as
they originally were, that is, to display the true raw documents. This
could be accomplish by running the Live Test using the original
documents stored in x_test and using the prep_func argument to
tell what function we want to be applied when classifying, in our case
it would be prep_func=my_preprocessing, as follows:
Live_Test.run(clf, x_test, y_test, prep_func=my_preprocessing)
Now the documents are displayed in their original format. We then can
interactively select individual words (or n-grams) and see, at the
bottom, its preprocessed version (that is, the actual token that was
used by SS3 to represent the word, or n-gram). For instance, as shown
below, when the user select the 3-gram “wasting your time”, at the
bottom is displayed “ ”
indicating the true value used by the classifier (arrows indicate
“transitions”, i.e., “going from one word to the other”). The same
happens, for instance, with the “watching” (and “behaving”) word,
indicating that it was converted to “
”
indicating the true value used by the classifier (arrows indicate
“transitions”, i.e., “going from one word to the other”). The same
happens, for instance, with the “watching” (and “behaving”) word,
indicating that it was converted to “ ” (and
“
” (and
“ ”) by our custom preprocessing process
(
”) by our custom preprocessing process
(my_preprocessing).
… and… that’s it for now, well done! :D
Hyperparameter Optimization
clf = SS3(name="movie-reviews")

# to speed up the process, we won't use 3-gram but single words
# (i.e. we won't use the n_grams=3 argument)
clf.train(x_train_prep, y_train, prep=False)
Training on 'pos': 100%|██████████| 2/2 [00:06<00:00, 3.01s/it]
best_s, best_l, best_p, best_a = Evaluation.grid_search(
    clf, x_test_prep, y_test,
    s=span(0.2, 0.8, 6),
    l=span(0.1, 2, 6),
    p=span(0.5, 2, 6),
    a=[0, .1, .2],
    prep=False,  # <- do not forget to disable default preprocessing
    tag="grid search (test)"
)

print("The hyperparameter values that obtained the best Accuracy are:")
print("Smoothness(s):", best_s)
print("Significance(l):", best_l)
print("Sanction(p):", best_p)
print("Alpha(a):", best_a)

Evaluation.plot()
Grid search: 100%|██████████| 648/648 [02:23<00:00,  4.51it/s]
The hyperparameter values that obtained the best Accuracy are:
Smoothness(s): 0.44
Significance(l): 0.48
Sanction(p): 0.5
Alpha(a): 0.0
clf.set_hyperparameters(0.44, 0.48, 0.5, 0.0)
y_pred = clf.predict(x_test_prep, prep=False)

accuracy = accuracy_score(y_pred, y_test)
print("Accuracy was:", accuracy)
Classification: 100%|██████████| 1000/1000 [00:00<00:00, 25847.37it/s]
Accuracy was: 0.828
The best accuracy with the obtained hyperparameters is 0.828. Now let’s train a 3-grams version using the same hyperparameters:
clf = SS3(0.44, 0.48, 0.5, 0.0, name="movie-reviews")

clf.train(x_train_prep, y_train, n_grams=3, prep=False)
Training on 'pos': 100%|██████████| 2/2 [00:13<00:00, 6.96s/it]
y_pred = clf.predict(x_test_prep, prep=False)

accuracy = accuracy_score(y_pred, y_test)
print("Accuracy was:", accuracy)
Classification: 100%|██████████| 1000/1000 [00:04<00:00, 208.72it/s]
Accuracy was: 0.853
The accuracy improved! it went from 0.828 to 0.853 :)